How to Tie a Rapala Knot: Step-by-Step Guide for Anglers
Tying a Rapala knot is essential for anglers. It’s strong and reliable.
If you love fishing, you know the importance of a good knot. The Rapala knot, named after the famous lure company, is a favorite among many. It ensures your lure moves naturally in the water. This knot is known for its strength and effectiveness.
Learning to tie this knot can make a big difference in your fishing success. Whether you are a beginner or an experienced angler, mastering this knot is a must. In this guide, we will show you how to tie a Rapala knot step by step. Let’s get started and improve your fishing skills!

Credit: www.rapala.eu
Introduction To Rapala Knot
The Rapala Knot is a popular fishing knot used by anglers worldwide. It creates a non-slip loop at the end of the fishing line, allowing the lure to move naturally. This movement attracts more fish, making it a vital skill for any fisherman.
Importance Of Rapala Knot
The Rapala Knot is essential because it offers several advantages:
- It provides a strong and secure connection.
- It allows the lure to move freely and naturally.
- It minimizes the chance of the line breaking.
These benefits make the Rapala Knot a favorite among fishing enthusiasts. Its simplicity and reliability ensure a successful fishing experience.
History And Origin
The Rapala Knot originated from the Finnish company, Rapala. Founded in the 1930s, Rapala is known for its high-quality fishing lures. They created this knot to enhance the performance of their lures. Over time, anglers around the world adopted the knot. Its effectiveness in catching fish made it popular. Today, the Rapala Knot is a standard technique in fishing.
Materials Needed
To tie a Rapala knot, you need some specific materials. These materials ensure the knot is strong and reliable. Let’s explore what you need to get started.
Essential Tools
First, gather essential tools. A good pair of fishing pliers is a must. These help you hold the line tight. You also need a sharp pair of scissors. Scissors will cut the line cleanly. A small, portable light can be handy too. It helps you see clearly, especially in low light.
Recommended Fishing Lines
Choosing the right fishing line is crucial. Monofilament lines are great for beginners. They are easy to handle and tie. Fluorocarbon lines are another good option. They are nearly invisible underwater. This can increase your chances of catching fish. Braided lines are strong and durable. They work well in heavy cover or deep water.
Now you know the materials needed to tie a Rapala knot. Happy fishing!
Preparing Your Line
Before tying a Rapala knot, you need to prepare your fishing line. This step ensures a strong and reliable knot. Follow these simple instructions to get your line ready.
Cutting The Line
First, cut your fishing line to the desired length. Use sharp scissors or a line cutter. A clean cut helps in threading the line smoothly. Avoid using dull tools to prevent frayed ends.
Threading The Line
Next, thread the line through the eye of the hook. Ensure the line passes smoothly without any twists. Pull enough line through the eye to allow for easy knot tying. This step is crucial for the knot’s strength.
Forming The Initial Loop
Forming the initial loop is a crucial step in tying a Rapala Knot. This loop ensures that your lure moves freely, mimicking the natural movement of bait. Follow these simple steps to get it right.
Creating The Loop
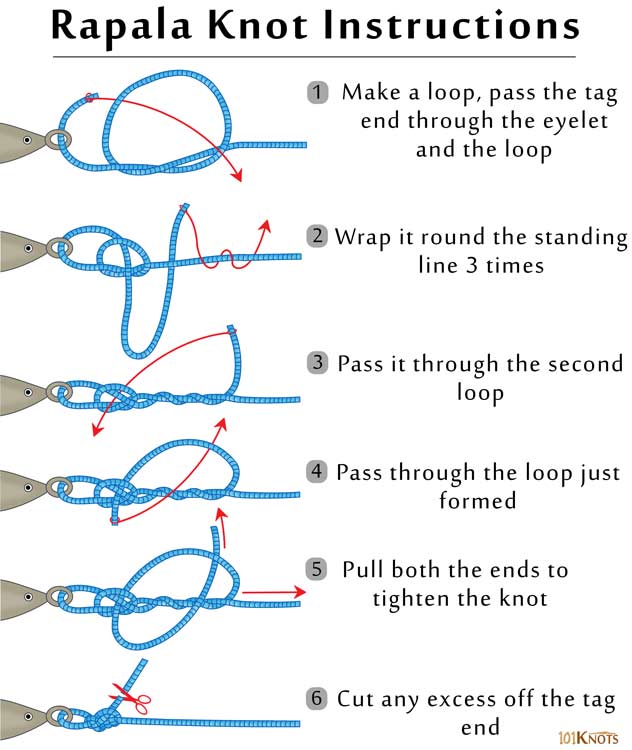
First, cut a length of line. Pass the tag end through the eye of the hook. Pull about six inches of line through the eye. Make sure to leave enough line to work with.
Next, form a loop by bringing the tag end over the standing line. Hold the loop between your thumb and forefinger. This is your starting point.
Securing The Loop
Now, wrap the tag end around the standing line. Make three to four wraps. Keep the wraps tight and close together.
After wrapping, pass the tag end through the loop you formed. Pull the tag end to tighten the knot. This secures the loop and completes the first step.
Wrapping The Line
Wrapping the line is a key step in tying a Rapala Knot. It ensures the knot is strong and secure. This section will guide you through the process.
Making The Wraps
First, hold the tag end of the line. Wrap it around the standing line. Start near the eye of the hook. Make sure the wraps are tight. Keep the coils close together. This prevents slippage. It also ensures strength.
Number Of Wraps Needed
How many wraps are needed? Aim for five to six wraps. This is usually enough. It provides a balance of strength and simplicity. If the line is thin, use more wraps. For thicker lines, fewer wraps may work. Adjust based on the line’s thickness. This will help you get the best result.

Credit: www.101knots.com
Threading Through The Loop
Tying a Rapala Knot starts with threading the fishing line through the loop. This step sets the foundation for a strong knot. It’s crucial to do it correctly to ensure the knot holds under pressure. Let’s break down the steps.
Inserting The Line
First, thread the line through the eye of the hook. Pull out about ten inches of line to work with. This extra length makes tying easier.
Next, form a loop by bringing the tag end of the line back towards the standing line. Hold both lines together between your thumb and forefinger. This loop will be the key to forming the Rapala Knot.
Positioning The Knot
Once the loop is formed, wrap the tag end around the standing line. Make three to four wraps around the standing line. This wrapping secures the loop in place.
After wrapping, insert the tag end through the small loop near the hook eye. Pull the tag end to tighten the knot. Ensure the wraps stay neat and do not overlap.
Finally, pull both ends of the line to secure the knot. Trim any excess line close to the knot. Your Rapala Knot should now be tight and ready for fishing.
Tightening The Knot
Tying a Rapala knot securely is crucial for successful fishing. A well-tightened knot ensures your lure stays in place. This section will guide you through the steps of tightening the knot effectively.
Pulling The Line
To start tightening the knot, pull the tag end and the standing line. Hold both ends firmly. This action will begin to close the loops around the lure.
Make sure the loops are neat and aligned. Misaligned loops can weaken the knot. As you pull, watch the knot carefully. Adjust if needed.
Securing The Knot
Once the loops are tight, hold the main line. Pull the tag end again to secure the knot. Ensure there are no twists or tangles.
Finally, moisten the knot with water or saliva. This reduces friction and prevents the line from weakening. Pull the main line firmly to set the knot. Trim the excess tag end, leaving a small tail.
Your Rapala knot is now ready. Practice these steps to ensure a strong, reliable knot each time.
Testing The Knot
After tying your Rapala Knot, it’s crucial to test its strength. This ensures your knot will hold up during fishing. Below are the key steps to follow.
Checking Knot Strength
First, gently pull on both ends of the line. This helps to see if the knot stays tight. Next, apply more pressure. Simulate the tension that a fish might cause. Watch closely for any slipping or loosening. If the knot holds firm, you have tied it correctly. If not, you might need to retie the knot.
Making Adjustments
Sometimes, the knot may not be perfect. Small adjustments can make a big difference. Start by examining the knot closely. Look for any twists or overlaps. If the knot is not lying flat, it may need tweaking. Use your fingers to smooth out any rough spots. Ensure the knot is secure and neat.
If the knot still slips, consider retieing it. Practice makes perfect. Each time you tie the knot, you will get better. Over time, you will be able to tie a strong Rapala Knot quickly.
Common Mistakes
Common Mistakes</</</</.com//common-mistakes</p
Tips And Tricks
Learning how to tie a Rapala knot can be a game-changer for anglers. This knot is known for its strength and reliability. Let’s dive into some tips and tricks to help you master it.
Choosing The Right Line
Selecting the proper line is crucial for tying a strong Rapala knot. Here are some tips:
- Monofilament line: This type of line is flexible and easy to handle.
- Braid line: It’s strong but can be slippery. Use more wraps to secure it.
- Fluorocarbon line: It’s invisible underwater but stiffer than monofilament.
Each line type has its own properties. Choose the one that best suits your fishing needs.
Practicing The Technique
Practice makes perfect. Follow these steps to get better at tying a Rapala knot:
- Start with a simple overhand knot: Loop the line around the hook or lure.
- Wrap the tag end: Wrap it around the standing line 5-6 times.
- Thread the tag end: Pass it back through the overhand knot loop.
- Moisten the line: This reduces friction and strengthens the knot.
- Tighten the knot: Pull the tag end and standing line to secure it.
Practice these steps regularly to improve your knot-tying skills.
Use a practice line before using your actual fishing line. This helps avoid frustration.
Remember to inspect your knot before casting. Ensure it is secure and properly tied.
Benefits Of Using Rapala Knot
Learning to tie a Rapala Knot offers numerous benefits for anglers. This knot is renowned for its strength and reliability. It is a must-know for any fishing enthusiast. Here are some of the key benefits of using the Rapala Knot:
Strength And Durability
The Rapala Knot is designed to be both strong and durable. This knot can withstand the pressure of large, fighting fish. It does not easily come undone. This makes it ideal for catching strong fish.
Here are some reasons why this knot is strong and durable:
- The double loop design adds extra strength.
- It distributes stress evenly.
- The knot remains tight even under heavy loads.
Versatility In Fishing
The Rapala Knot is versatile. It works well with various types of fishing lines, including monofilament and braided lines. This makes it useful for different fishing techniques.
Some examples of its versatility:
| Fishing Technique | Benefit of Rapala Knot |
|---|---|
| Fly Fishing | Allows natural lure movement |
| Saltwater Fishing | Resistant to corrosion |
| Freshwater Fishing | Strong hold on fish |
Using this knot enhances your chances of a successful catch. It provides flexibility and reliability in various fishing scenarios.

Credit: www.rapala.com
Frequently Asked Questions
What Is A Rapala Knot Used For?
A Rapala knot is used for attaching lures to fishing lines. It allows the lure to move freely, making it more effective in attracting fish.
How Do I Tie A Rapala Knot?
To tie a Rapala knot, create an overhand knot, pass the tag end through the lure eye, wrap it, and secure.
Why Choose A Rapala Knot Over Others?
A Rapala knot is chosen for its non-slip properties and ability to enhance lure movement. It is ideal for fishing.
Can Beginners Tie A Rapala Knot?
Yes, beginners can tie a Rapala knot. It is simple to learn and requires minimal practice to master.
Conclusion
Mastering the Rapala knot enhances your fishing success. It’s simple and effective. Practice it a few times at home. Soon, you’ll tie it effortlessly. This knot ensures your lure moves naturally. Fish find it hard to resist. So, next time you’re out fishing, use the Rapala knot.
Happy fishing and tight lines!


