How to oil fishing reels – keep it clean
Your fishing reels are the driver of your fishing equipment. You need it smooth and functioning at all times to make your fishing expeditions a smooth sail. If it’s dirty, rusty, or stuck, you may face many difficulties in the middle of the action.
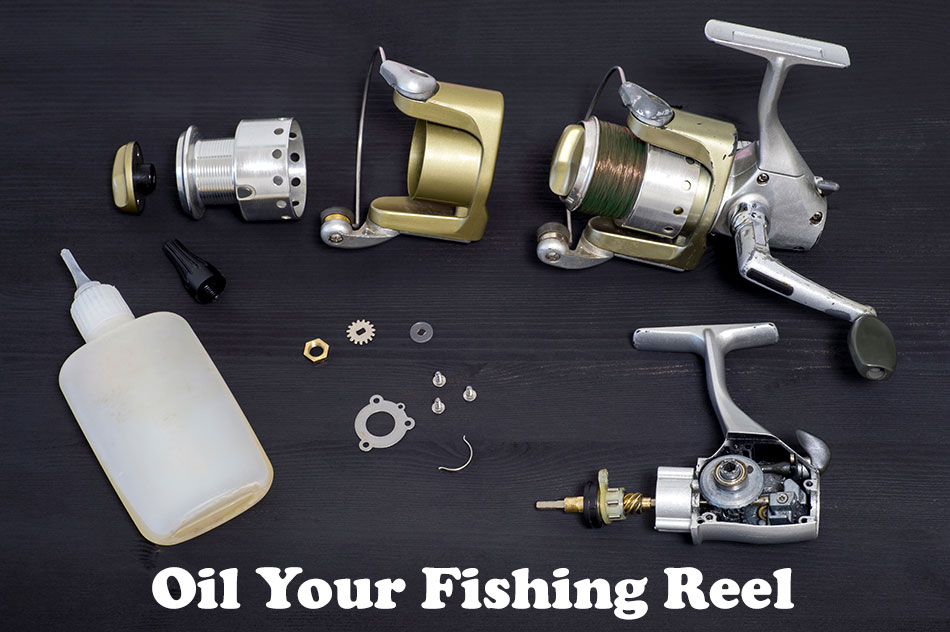
At its basic, a fishing reel is a compact machine rather than a tool. It is made of several parts, including the handle, moving gears, bearings inside, and the spool on top. All nicely assembled and set perfectly over one another. Most parts are metallic and naturally prone to rust and corrosion due to water, humidity, salt, sand, dirt, and dust.
Like any other machine, your fishing reel, therefore, needs basic maintenance to roll on and keep rocking!
It’s easy to oil your fishing reel yourself
Cleaning and oiling your spinning reel isn’t rocket science. Every reel is a piece of engineering fitted perfectly together. For oiling, it requires very little disassembly. Most fishing reels can be taken apart and refitted within minutes.
On the other hand, outsourcing this basic task can cost you hundreds of dollars while you’re never sure of the level of care.
Things you need for oiling a fishing reel
The resources you need to first clean and then oil and lubricate your fishing reel are very basic. These include:
- A well-lit working space
- Reel oil and grease (or 3 in 1 oil)
- Isopropyl Alcohol (for cleaning)
- Paper towels
- Q-tips
- Screwdriver (as may be required for some reels)
Please note that instead of using oil and grease separately, you may use the widely available 3 in 1 oil to lubricate the metal parts. Also, there are several Reel Oiling Kits on the market that require no, or very little, additional equipment.
Cleaning and Oiling Your Fishing Reel: Step by Step
1. Clean and oil the bail first:
Flip the bail into the open position. Clean around it to remove dust, debris, or rust. Put a drop of oil into each side of the flipping mechanism where the bail meets the assembly. Flip the bail back and forth a few times to let the oil seep in. Dry out the excess oil with a paper towel.
2. Repeat the process for the outside of the handle:
Put a drop inside the turning mechanism of the knob. Rotate the knob to let the oil in. Wipe away excess oil.
3. Remove the spool:
Position the reel so that the spool faces up. Unscrew the drag adjustment knob atop the spool by turning it anti-clockwise. Gently remove the knob and then the spool. In some reels, the spool can be removed with a button at the back.
4. Clean over and inside the spool on both sides:
Inspect the spool and the knob for dirt and clean it. Use a Q-tip dipped in alcohol for cleaning on the inside. Be gentle with the spring and any delicate parts inside. Also, clean the drag adjustment knob where it meets the spool.
5. Apply grease inside the spool and the knob:
Grease the spool where it goes through the rotor. Also, grease the knob where it meets the spool. Use tiny amounts as excess grease may absorb dirt and hamper smooth movement. Clean away any excess grease.
6. Next, clean the rotor assembly:
Clean the rotor shaft on all sides with a Q-tip. Using a Q-tip, remove any residues from the shaft as well as from inside where the shaft connects to the assembly.
7. Oil the rotor shaft:
Put a drop or two of oil on the shaft, wipe and clean excess oil. Put a tiny amount of grease where the shaft attaches to the assembly. Gently rotate the handle so the grease sets in. Remove excess oil and grease with the help of a paper towel and a Q-tip. Never pour excess oil down the shaft as it may cause the failure of the anti-reverse function.
8. Put the spool back on:
Readjust the shaft and any parts to their original position. Place the spool through the shaft and the knob on top of it. Tighten the knob clockwise as much as possible. You can later readjust the knob to your desired level. Rotate the handle to check everything is working perfectly.
9. Last, clean and grease inside where the handle meets the assembly:
Unscrew the cap on the opposite side of the handle. Then unscrew the handle by gently rotating so it comes off. Wipe away any old grease or dirt from every inner part that is now visible. For some reels, you’ll need to remove a few screws with a screwdriver to remove the handle.
10. Apply grease inside the rotating mechanism:
Apply grease to the bearings and gear inside where the handle braces the assembly. Also apply tiny amounts on the inner side of the screw cap, and inside its hole. Remove excess grease.
11. Reassemble the handle:
First, put the screw cap back on and tighten it. Then put the handle on the other side and rotate so it firmly sets into the assembly. Revolve the handle to check everything is working.
12. Clean the entire surface of the reel with a paper towel:
Wipe away any grease, oil or alcohol. Rotate and feel the new-found smoothness and agility of your reel. You’re done!
Key Precaution:
Do not apply grease or chemicals to any plastic components inside the reel. Doing so may cause more harm than any good.
Remember:
Disassembling and re-assembling fishing reels for maintenance is easy. You need to remove one part at a time, clean and oil it, and reassemble it, before moving on to the next. If you are not confident, practice this process with someone experienced to learn and master each step.
Also, some reels are different and require additional, not-so-easy steps. Product manuals come in handy in such situations. Always refer to someone experienced whenever you are not so sure.
Is DIY oiling of fishing reels worth it?
Absolutely! Your reel needs your attention and upkeep to keep working. With regular care, an average reel may last you many years, to save you hundreds and even thousands of dollars.
What’s more, fishing reels need inner oiling very sparingly. This is easy to do a couple of times a year, especially before and after the fishing season, or whenever the reel feels clumsy to handle.
You can see: How to Oil a Fishing Reel – Step-By-Step Breakdown
Also, check the video below on How to Oil Your Fishing Reel
Conclusion:
It pays to be able to oil your own fishing reel. Regular maintenance extends the life of your equipment and makes your fishing experience a lot smoother. The key steps involved are easy even for novices. If you are still not confident, consult an experienced fishing enthusiast. Or, hire professional services since keeping your reel clean and well-oiled is a must.

