How To Dye Shrimps For Salmon Fishing
When it comes to catching salmon, shrimps are one of the best choices. But, the color should be attractive enough to attract shrimps. If it looks pale or dull, salmon will ignore them. You can dye the shrimps to make them attractive for salmon fishing.
Add enough amount of water to a pot and boil it slightly. Then, pour the dye product and boil it on low heat until it is fully dissolved. Let it cool down naturally, and use a kitchen roll to remove moisture from the body. Then keep them in an airtight container and store them in the refrigerator at average temperature until you use them for fishing.
How To Dye Shrimps For Salmon Fishing Step-by-step
A lot of products are available for coloring shrimp for salmon fishing.
You can use both natural colors and chemical-based colors to dye shrimps.
Chemical-based dye products are easy to use and quickly add vibrant color to the shrimp body. However, you want to make sure salmon fish don’t eat them.
Otherwise, it will harm you if you eat the particular salmon fish.
But, if you can take the hassle of naturally dying the shrimps, natural-based products are more practical.
They mainly improve the color and make it more attractive. However, it is slightly expensive because you need several products.
Here, we are mentioning two different methods for coloring shrimps effectively. Use these shrimps with good salmon fishing rods and reels for the perfect catch.
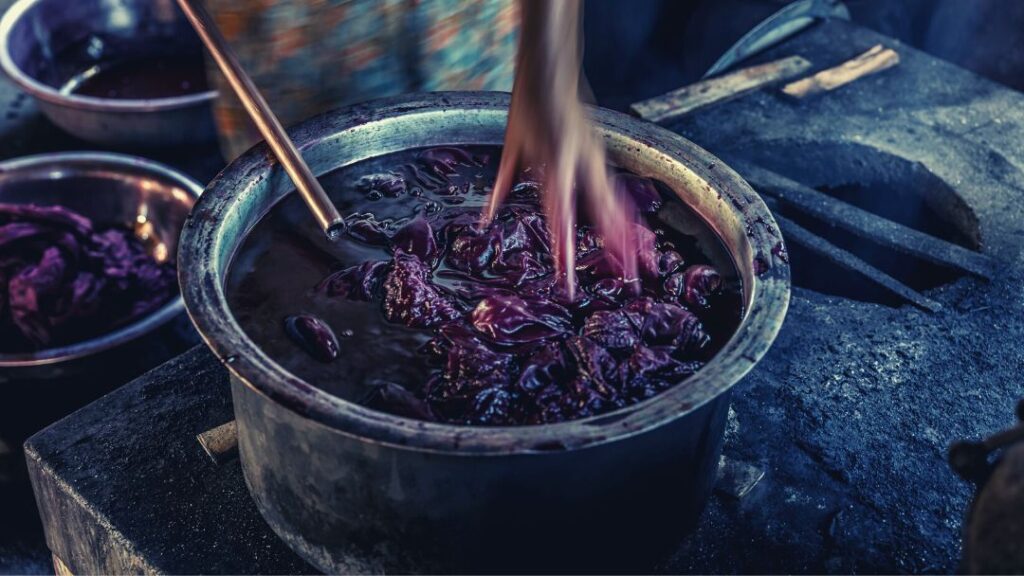
Method 01: Purple Dye
Do your shrimps have a clear or transparent tone? Improving the color appears impractical.
Instead, you need to apply a dark color to replace the transparent tone. You can use blue or purple to make the shrimp’s appearance more attractive.
The followings are steps to follow to dye shrimps for salmon fishing.
| Item Name | Quantity/ Size |
| Sea Salt | One tablespoon |
| Dylon Purple Dye | One piece |
| Glycerine mix | A small amount |
| Shrimps | 8 to 10 pieces |
| Water | Based on the requirement |
| A pot | 2- or 3-quart |
| A container | 500 to 700 ml |
Step 01 – Adding The Items
Grab a small 2- or 3-quart pot. Pour enough amount of water. You can start with 1/2 a pot.
Then, add a small amount of Dylon Purple Dye and Glycerine mix.
If you add too much water, increase the dye quantity. Otherwise, the color will not be darker.
The main reason behind adding Glycerine mix is to make the shrimp softer and prevent it from breaking and chipping.
Step 02 – Including Shrimps
Now, you want to add the shrimp to the mixture. Avoid using any pre-boiled shrimp. They will become excessively softer if you boil them again.
But what should be the size of the shrimps? It is best to collect 2 ½ to 3-inch shrimps.
Both small and mid-sized salmon species love to eat them.
Don’t add too much shrimps at a time. Otherwise, the temperature will go beyond the boiling point for a long session.
Boil the mixture for 5 to 6 minutes at low heat. Avoid boiling for too long. Or the shrimp will become too soft.
Step 03 – Storing The Dyed Shrimps
After boiling the mixture properly, turn off the stove or cooker. Let it cool down naturally.
Avoid using any cold water to cool the dyed shrimp. Otherwise, they will become fragile.
Once they become fully cool, put each of them on a thick kitchen roll. Wear rubber gloves to prevent your hands from dying.
Dab them carefully to get off the moisture from their body.
Then, sprinkle a small amount of sea salt or rock salt to preserve them and help keep out bacteria.
Grab a small 500 ml container or a sealed bag and place all dyed shrimp one by one. Store the dyed shrimp in the refrigerator under medium temperature.
Method 02: Red Dye
Don’t your shrimps have a fully transparent color, but you want to enhance its color?
Improving the color will make it more palpable to salmon.
Though it is a little bit hassle, and you need a good number of items, it is worth the investment.
Here are the steps you want to go through achieve a bright reddish-orange hue by dying the shrimps.
| Item Name | Quantity/ Size |
| Agar-agar red powder | 2 grams |
| Chlorella red powder | 6 grams |
| Astaxanthin | 2 grams |
| Bee Pollen | 2 grams |
| Water | 350 ml |
| A pot | 2- or 3-quart |
| A container | 500 to 700 ml |
Step 01 – Adding The Ingredients
Grab a small 2- or 3-quart pot. Pour 350 ml of water.
Then, add 2 grams of Agar-agar red powder. Turn on the cooker or stove. Boil the mixture on low heat.
Now, use a small spatula to stir the mixture continuously. Don’t stop. Otherwise, the Agar-agar solution will stick to the pot.
Make sure to use low or medium heat to boil the mixture. Keep boiling the mixture until all the agar powder is fully dissolved.
It may take around 5 to 6 minutes to dissolve them if the heat is low or medium.
Step 02 – Pouring Shrimps
Once all the agar powder is dissolved, you can add the shrimp to the mixture. Avoid using any pre-boiled shrimp. They will become excessively softer if you boil them again.
But what should be the size of the shrimps? It is best to collect 2 ½ to 3-inch shrimps.
Both small and mid-sized salmon species love to eat them.
Don’t add too much shrimps at a time. Otherwise, the temperature will go beyond the boiling point for a long session.
Boil the mixture for 5 to 6 minutes on low heat. Avoid boiling for too long. Or the shrimp will become too soft.
Now, you want to add Chlorella powder, Bee Pollen and Astaxanthin into the mixture and boil for a few minutes to create an even mix.
Step 03 – Storing The Dyed Shrimps
Once the mixture is appropriately boiled, switch off the cooker or stove. Make sure the mixture is cooled own naturally.
You don’t want to use cold water to cool the dyed shrimp. Or it will make the boiled shrimp fragile.
After thoroughly cooling the shrimps, place each of them on a single thick kitchen roll.
Make sure to use rubber gloves to keep your hands protected from color.
Dab them carefully to remove water from their body.
Then, sprinkle a small amount of sea salt or rock salt to preserve them and help keep out bacteria.
Grab a small 500 ml container or a sealed bag and place all dyed shrimp one by one. Store the dyed shrimp in the refrigerator under medium temperature.
Which Shrimp Color Is More Palatable To Salmon?
A bright reddish-orange hue is the most attractive color for salmon fishing. After all, you want to give them a feel of live bait.
However, purple and blue are also effective for catching salmon because they see these colors better in deeper water,
You can also improve the green-brown color of shrimp to make it attractive.
But it will be time-consuming and laborious. Plus, the shrimp body may break down if it is boiled for too long.
If you don’t want to take the hassle, buy them from an online or nearby store.
Summing Up
Unless the bait is attractive and palatable to salmon, it will try to catch it. Color is one of the most important things that will determine whether the fish will try to eat the bait or not.
You might be struggling to find readymade dyed shrimp from your location. In such a case, you can color them at home by using dyed products.
All you need to know is how to dye shrimps for salmon fishing step-by-step. We have already mentioned two methods. You can follow either of them that seems convenient to you.