How to Read a Fish Finder: The Basics for Beginners
Reading a fish finder can seem complicated at first. But once you know the basics, it’s much easier.
A fish finder is a useful tool for anglers. It shows underwater details, helping you locate fish. Understanding how to read one can improve your fishing success. This guide will explain the basic features and functions. You’ll learn how to interpret the data on the screen.
By the end, you’ll feel more confident using your fish finder. Whether you’re a beginner or need a refresher, this introduction will set you on the right path. Let’s get started and dive into the basics of reading a fish finder.

Credit: www.youtube.com
Introduction To Fish Finders
Fish finders are essential tools for anglers. They help locate fish underwater. Understanding how to read a fish finder can enhance your fishing experience. This guide will introduce you to the basics of fish finders.
Purpose And Benefits
Fish finders use sonar technology to detect fish. They send sound waves into the water. When these waves hit objects, they bounce back. The device then displays these objects on the screen. This helps you know where to cast your line.
Using a fish finder saves time. You do not need to guess where the fish are. This increases your chances of a good catch. Fish finders also show water depth and temperature. These factors affect fish behavior. Knowing them can help you choose the right bait and technique.
Basic Components
A fish finder has several key parts. The transducer is the most important. It sends and receives sound waves. The display screen shows the information from the transducer. There are buttons or a touch screen for control. Some models have GPS for navigation.
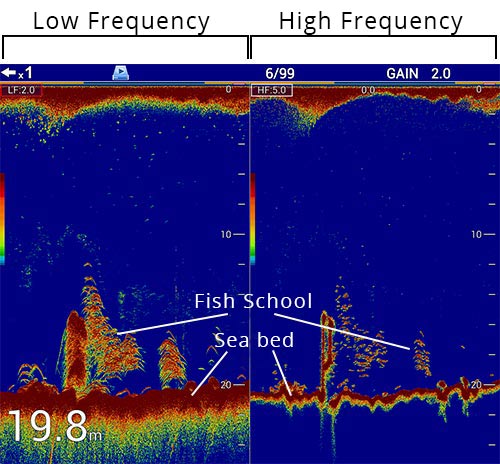
The transducer is usually mounted on the boat. It can be placed on the hull or a trolling motor. The screen shows fish as arches or icons. Depth readings appear on the side. Some models show the structure of the bottom. This helps you avoid obstacles.
Understanding these components is the first step. With practice, you will read your fish finder like a pro.
Types Of Fish Finders
Understanding the different types of fish finders can help you choose the right one. Fish finders come in a variety of designs, each with unique features and benefits. Below, we will explore two main types: Standalone Units and Combo Units.
Standalone Units
Standalone fish finders are basic but effective. They focus solely on finding fish. These units are often simpler and more affordable. They are perfect for beginners or those on a budget.
Here are some key features of standalone fish finders:
- Easy to use
- Clear display
- Basic sonar technology
- Cost-effective
Standalone units are a great choice for small boats or casual anglers. Their simplicity makes them user-friendly. You can rely on them to identify fish in your vicinity.
Combo Units
Combo units offer more than just fish finding. They combine fish finding with other features like GPS. These units are ideal for more serious anglers.
Here are some benefits of combo units:
- Integrated GPS
- Advanced sonar technology
- Mapping capabilities
- Versatile functionality
Combo units provide a comprehensive tool for fishing. They help you find fish and navigate waters safely. This makes them a popular choice among experienced anglers.
Below is a comparison table of the key features:
| Feature | Standalone Units | Combo Units |
|---|---|---|
| Ease of Use | High | Moderate |
| Cost | Low | High |
| Sonar Technology | Basic | Advanced |
| Additional Features | None | GPS, Mapping |
Choosing the right fish finder depends on your needs and budget. Standalone units are simple and affordable. Combo units offer advanced features and functionality.
Understanding Display Screens
Reading a fish finder starts with understanding its display screen. The screen shows different information about the underwater world. This section will help you understand what you see on the screen.
Color Vs. Grayscale
Fish finders come with either color or grayscale screens. Color screens display a variety of colors. Each color represents different objects or depths. This makes it easier to distinguish between fish and other items.
Grayscale screens use shades of grey. Darker shades show stronger signals. Lighter shades show weaker signals. While they are less detailed, they are often cheaper.
Screen Resolution
Screen resolution refers to the clarity of the display. Higher resolution screens show more detail. This helps you see fish and structures more clearly. If you want a clearer picture, choose a fish finder with high resolution.
Low resolution screens show less detail. They might be harder to read. But, they are usually more affordable. Decide based on your needs and budget.
Interpreting Sonar Readings
Understanding how to read a fish finder can seem daunting. But it doesn’t have to be. Sonar readings are an important part of this process. This section will help you interpret these readings. We’ll cover the basics of fish icons, arches, and bottom contours.
Fish Icons Vs. Arches
Fish finders display fish in different ways. Some use fish icons, while others show arches. Knowing the difference is crucial.
- Fish Icons: These are simple symbols that represent fish. Easy to understand but not always accurate.
- Arches: These are more accurate. Fish appear as arches because of the sonar cone’s movement. The middle of the arch shows the fish’s true position.
Choose the display that suits your needs best. Icons for simplicity, arches for accuracy.
Bottom Contour And Structure
The bottom contour is the shape of the lake or sea floor. Structures include rocks, plants, and other objects. Knowing these can help you find fish.
| Term | Definition |
|---|---|
| Bottom Contour | The shape and slope of the underwater terrain. |
| Structure | Objects like rocks, plants, and wrecks on the bottom. |
Look for changes in the bottom contour. Fish often gather around structures. Use the sonar to spot these areas.
Understanding sonar readings is key to successful fishing. Fish icons and arches tell you where the fish are. Bottom contours and structures show where they might hide. Practice reading these to improve your fishing skills.
Adjusting Settings
Adjusting the settings on your fish finder is crucial for accurate readings. Proper adjustments help you see more details and distinguish between different underwater objects.
Sensitivity And Gain
Sensitivity and Gain control how much detail your fish finder displays. Higher sensitivity shows more detail but can clutter the screen with noise. Lower sensitivity reduces noise but might miss smaller fish. Adjusting these settings helps balance detail and clarity. Start with a mid-range setting and tweak as needed for your specific water conditions.
Frequency Settings
Frequency Settings determine the depth and detail of the sonar readings. Higher frequencies (200 kHz) offer better detail but less depth penetration. Lower frequencies (50 kHz) penetrate deeper but with less detail. Use high frequency in shallow waters for better resolution. Choose low frequency in deeper waters to see more depth.

Credit: www.youtube.com
Using Gps Features
Fish finders are essential tools for anglers, providing detailed information about underwater landscapes. Understanding how to use the GPS features on your fish finder can greatly enhance your fishing experience. This section explores the basics of using GPS features, focusing on marking waypoints and navigational aids.
Marking Waypoints
Waypoints are specific locations you can save on your fish finder. These could be spots where you found a lot of fish or where there are underwater structures.
To mark a waypoint:
- Press the waypoint button on your fish finder.
- Use the cursor to select the exact location on the screen.
- Save the waypoint with a descriptive name.
Marking waypoints helps you return to the same spot later. This is useful for tracking productive fishing locations.
Navigational Aids
GPS features on fish finders also provide navigational aids. These tools help you move safely and accurately on the water.
Common navigational aids include:
- Routes: Predefined paths that guide you from one waypoint to another.
- Tracks: Paths you’ve traveled that you can save and follow again.
- Speed and Distance: Real-time data to monitor your travel speed and distance covered.
Using these aids ensures you navigate efficiently and avoid hazards. They help you make the most of your time on the water.
Maintaining Your Fish Finder
Keeping your fish finder in top condition ensures it always works well. Regular maintenance helps to extend its life and improve its performance. This section covers some basic tips on maintaining your fish finder.
Regular Cleaning
Clean your fish finder often to keep it running smoothly. Use a soft, damp cloth to wipe down the screen and body. Avoid harsh chemicals. These can damage the screen or other parts.
Check the connections. Make sure there is no dirt or debris. This can affect the performance. Clean the connectors with a dry cloth. Keeping your fish finder clean will help it last longer.
Software Updates
Fish finders often have software updates. These updates can fix bugs and add new features. Check for updates regularly. Visit the manufacturer’s website for the latest version.
Updating the software is simple. Download the update to a memory card. Insert the card into the fish finder. Follow the on-screen instructions. Keeping the software up-to-date ensures the best performance.
Common Mistakes To Avoid
Understanding how to read a fish finder can significantly boost your fishing success. But many anglers make common mistakes that hinder their progress. This section outlines some of these errors and how to avoid them.
Ignoring Manual
Many users skip reading the manual. It’s a big mistake. The manual contains crucial information about the device. It provides details on settings, features, and troubleshooting. Skipping it means missing out on valuable tips and instructions.
Overcomplicating Settings
Fish finders come with various settings. Many anglers overcomplicate these. They tweak too many settings at once. This can lead to confusion and incorrect readings. Stick to basic settings first. Learn how each one affects the display. Gradually adjust them as you become more familiar with the device.

Credit: www.furuno.com
Frequently Asked Questions
What Is A Fish Finder And How Does It Work?
A fish finder is a device that uses sonar to detect fish underwater. It sends sound waves and displays the echoes on a screen.
How Do I Read The Fish Finder Screen?
To read the screen, identify the bottom, fish icons, and vegetation. Fish appear as arches or dots.
What Do The Colors On A Fish Finder Mean?
Colors represent different signal strengths. Stronger signals are usually shown in red or yellow, indicating solid objects or fish.
How Can I Adjust The Sensitivity On My Fish Finder?
Adjust the sensitivity to filter out noise and improve target detection. Increase sensitivity in deeper waters.
Conclusion
Understanding your fish finder can greatly improve your fishing trips. Practice regularly to get familiar with the device. Read the manual for better insights. Adjust the settings based on your fishing environment. Pay attention to the display to spot fish and structures.
The more you use it, the easier it gets. Happy fishing!


